This post contains affiliate links. I could be an affiliate for many different products, but I chose these specifically because they are the products and brands I like and recommend. By using my links, you help support this website.
For a complete guide to all Textile Indie’s basket weaving posts and videos, visit the main Basket Weaving Page.
How do you lash the rim of a basket?
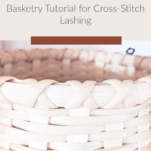
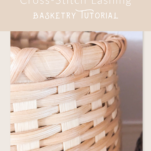
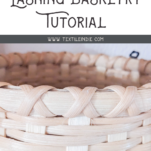
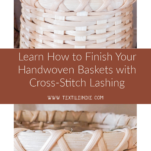
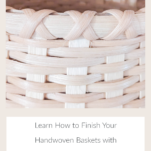
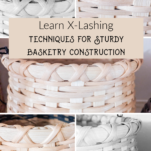
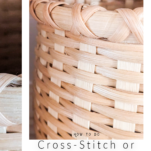
Rattan baskets are finished off with a rim made of reed and a lashing technique. The most common types of lashing are basic lashing – similar to a whipstitch in sewing, and cross-stitch lashing. Sometimes called X-lashing, cross-stitch lashing creates a pattern of x’s around the rim.
For a complete list of basket terminology:
What is lashing?
Lashing is a process of “whip stitching” around the rim to hold everything in place. To do this the basket weaver uses a long length of reed approximately half the width of the rim reed. Often the lashing reed is a flat reed or a flat oval reed.
For small baskets, round reed works as a lashing.
The length of reed is soaked in water to make it pliable. Then it is threaded around the layers of the rim and the last row of the basket to secure the rim to the basket with a whip stitch. These whip stitches are continued around the rim holding everything snuggly in place.
The goal in doing the lashing on the rim is to pull the lashing as tight as you can without breaking the lashing reed. Reed shrinks as it drys. Pulling each stitch tight as you go will avoid having large gaps in the rim once the basket is completely dry.
Basic lashing
Basic lashing can also be called a whip stitch or single lashing. This is when lashing is going in one direction and then tied off.
See How to Do Basic Lashing on a Basket Rim for a tutorial on how to do basic lashing.

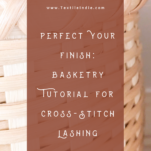
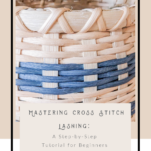
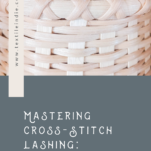
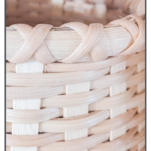
Cross-stitch lashing or X-lashing
A cross-stitch lashing or x-lashing is a basic lashing around the rim in one direction and then going back over the first round of lashing in the opposite direction creating a criss-cross in the lashing reed, or ‘x’ shapes.

Have you set up the rim?
Of course, you must set up the basket’s rim before you can get to the lashing.
Read How to Set Up a Rim on Your Basket to do this.
Follow the steps to prepare your basket for lashing.
Step-by-step guide to basic lashing
To see basket lashing in motion, check out this video – the process is the same for round and rectangular baskets:
Gathering materials and tools for lashing
- Basket with the rim set up (see How to Set Up the Rim on Your Handwoven Basket for instructions on how to prepare the rim)
- Workspace set up
- Reed shears
- Lashing reed (the size and width depends on the basket you are working on. See more below)
- Straight tipped packer

- Water tub
- Towel
Lashing reed width
I typically use a 1/4″ flat-oval reed for my lashing. When I’m weaving something small I’ll use a thinner size or a round reed. Generally speaking, 1/4″ flat-oval looks nice on a rim that ranges from 1/2″ wide to 1″ wide.
The size of the lashing and the size of the rim need to correspond to maintain the durability of the basket. If you have a one-inch wide rim, and use a piece of thin round reed for the lashing the rim will overpower the lashing and will strain against it, potentially causing breakage.
Consider balancing the width of the rim reed and the width of the lashing reed for a pleasing look and strength.
Lashing reed type
Possible lashing reeds: flat reed, flat-oval reed, round reed, cane.
I prefer a flat-oval reed for the lashing on my baskets because I like how the rounded side of the reed looks lashed around the rim. This is a personal preference. Choose the lashing type that looks good on your basket. You can always do a few stitches to see how a specific reed looks and pull it out if you don’t like it.
Measuring out your lashing reed
When I am measuring reed for the lashing I like to wrap the length around the top of the basket.
Find a piece that wraps around the top of your basket six times. This is a general estimate. It may be longer or a bit too short, but it’s a good starting point.
Soak lashing reed
Lashing reed gets beat up as you pull it through the spaces in the basket and slide it through your hands. To avoid cracking the reed, soak it in a tub of warm water for five minutes before beginning to lash your rim.
As you lash your rim, stop every few stitches to spray the lashing reed and the rim with the spray bottle of water to keep the reed damp. Damp reed becomes less “hairy,” and it’s easier to get tight.
Starting the lashing
Creating the starting knot
Use plastic clamps to secure the rim to the top edge of the basket. Using a soaked piece of lashing reed, begin by tucking the lashing reed between the inner rim and the top weaver. Do this right over a stake.

Bring the end you just tucked in between the layers back up and around into the same space again. Create a loop around the inner rim.
Grab the length of reed looped around the rim, and pull down on the inside of the basket to tighten the loop. Cinch the ‘knot.’
Then tuck the end behind the rows of weaving that go over the top of the stake. Use your straight tipped packer to lift the weaver layers away from the basket – just enough to slide the end of the lashing between them.


Do you want the best resources, tools, and products for fiber artists?
Every other Friday, I send an email chock full of fiber craft inspiration for you to explore.
Each issue focuses on one fiber art skill – spinning, dyeing, basket weaving…
How to cross-lash a basket
Whip stitch
The whip stitch happens between each stake in the basket. You will catch the top row of weaving and the rim in each stitch so they will sandwich together.
Grasp the lashing reed with your non-dominant hand and slide it through your fingers gently all the way to the end. This technique keeps the reed oriented the same way along the length, so it doesn’t twist when creating your stitch.
I typically work from left to right when doing lashing. Follow the same instructions going right to left if that seems easier.
Using the straight tipped packer, slide the tip into space between the first and second rows of the basket to create room for the lashing reed to slide between them. You will need to do this while holding the lashing reed in your left hand.
With the correct orientation of the reed, slide the lashing reed into the open space and all the way through. Once you’ve pulled all the excess through, tighten your whipstitch by pulling on the working reed.
Tension matters. Pull tight on the lashing reed as you work. As it dries, the reed will shrink.
A loose rim is vulnerable.
Continue stitching the rim, putting one stitch into each space between the stakes of the basket.


Lashing the overlapped ends of the rim
When you go over the joints, as shown below, make sure to hold the rim in place and maintain its position so the rim sits against the basket.
If you run out of lashing reed or it breaks
If you run out of lashing reed before you’ve made it all the way around the basket, or if the lashing breaks, you’ll splice in a new piece of reed.
Undo a few of the lashed stitches so that you have a tail long enough to push to the inside of the basket between the top and second row of weavers. As you did with the beginning knot, loop the end around the inner rim and pull down into the wall of the basket to secure it.
Begin with a new length of lashing reed the way you started the basket by sliding the end between the inner rim and the basket, looping it around, and tucking it into the basket wall. Do this right next to where you left off. Carry on lashing the rim.

Back to the beginning – finishing cross-lashing
Once you’ve gone around the basket with a basic whip stitch, ensure you’ve gone into every space between stakes.
Now do the same process in the opposite direction.
Be sure to run the lashing reed through your hands, so it doesn’t get twisted. Creating the space between the first and second row of weaving with the straight tipped packer, and thread the lashing through the hole, pulling it tight.
Go back around the basket, putting a stitch between each stake; there will now be two stitches in each space.

Tying off the lashing
Keep your lashing reed and all the rim wet as you work. Pull tight on the lashing as you go. Again, a reminder that the reed shrinks as it dries. A loose rim is easily broken and looks sloppy.
To tie off the lashing and finish the rim, loop it around the inner rim and pull it down into the basket wall to secure it, as you did for the starting knot. Tuck the end into the weavers in the basket wall.

Finishing steps
Allow the basket to dry
When the rim is complete, do any final shaping or molding of the basket while it is still wet. Allow the basket to dry overnight.
Signing the basket
Sign and date your basket with a waterproof pen. Signing your baskets is a great way to see your progress as you continue to weave baskets.
If you would like to explore creative ways to make your baskets check this post:
Signing Your Handwoven Baskets: Leaving a Legacy

Staining or sealing the basket
Once your basket is completely dry, you have the option to stain or seal the basket.
I highly suggest at least sealing your basket with a clear finish to preserve the basket and avoid mildew and mold.
How to Protect Your Basket After Weaving
There’s the option to stain your basket with wood stain, changing the color. Consider staining if you want something darker, a wash of color, or a different wood tone.
Basket Stains and Sealers: Finishing Your Baskets

When you’ve completed your basket, I’d love to see a photo of it. Please tag me on Instagram @textileindie.
For a complete guide to all Textile Indie’s basket weaving posts and videos, visit the main Basket Weaving Page.
More basket weaving techniques:
How to Cut Reed for Basket Stakes
How to Weave an Open Basket Base
How to Weave a Closed Basket Base
Twining a Basket Base: Creating a Stable Basket
Weaving Techniques for Basket Making
How to Set Up the Rim of a Basket
How to do Basic Lashing on a Basket Rim
Signing Your Handwoven Baskets: Leaving a Legacy
How to Protect Your Handwoven Baskets from Mold
Basket Stains and Sealers: Finishing Your Basket
Basketry Immersion: A Year-Long Journey
Check out Textile Indie’s self-paced basket program if you want to learn to weave beautiful baskets.
Twelve different basket designs with video and written instructional support to learn foundational basketry techniques.
Over the course of twelve months, you will receive one basket pattern and a video with supporting instructional material each month. Start at basket one and weave all twelve.