This post contains affiliate links. I could be an affiliate for many different products, but I chose these specifically because they are the products and brands I like and recommend. By using my links, you help support this website.
An in-depth look at the mechanics of a spinning wheel.

What is a spinning wheel?
At its most basic, a spinning wheel is a human-powered machine that adds twists to fiber, creating yarn. It combines a wheel, drive bands, flyer, and tension to make yarn by twisting fibers to create a strong cord.
Learning how to use a spinning wheel
Note: Like most handicrafts, the written instructions will make more sense if you can see someone visually demonstrate. I’ve included a video of this process above.
I suggest you watch the video and read the blog post to solidify your understanding.
How to treadle a spinning wheel
When beginning on a spinning wheel, I like to have students start by getting a feel for how the treadle works.
Treadle and learn to maintain a steady speed. This practice works for both single and double-treadle wheels.
Be sure to have the drive band looped around the drive wheel and the whorl so you get an accurate feel for the treadle.
I’ll go through a detailed view of spinning wheel anatomy in the second half of this post.
How to draft fiber for spinning
The next thing I suggest practicing is drafting fiber.
I find a short draw is easier to control when first learning to juggle a spinning wheel’s moving parts.
Take a piece of roving and pull it apart into four sections lengthwise.
Take one of the sections, pinch the end of the fibers gently, and slowly draw out a tuft of the fiber without pulling it off the piece of roving.
Now grasp the end of the draw closest to the roving and do another drafting, pulling out a short amount of fiber and extending your piece of drafted roving.
Continue doing this until you feel you can draft an even amount of fiber each time and have a bundle of pre-drafted fiber.
We’ll use this to begin spinning.
Set it aside for now.
How to set up a leader yarn
To begin using a spinning wheel, you must set up a leader yarn.
The leader yarn is attached to your fiber as you begin spinning.
Cut a piece of yarn approximately 20 inches long.
Tie one end around the bobbin of the spinning wheel.
Thread around one of the hooks on the flyer wheel and then put the yarn through the orifice hole. Now, your leader yarn is set up for spinning.
Adjust the tension on your spinning wheel
If you are new to your wheel, you will probably need to experiment with how much tension is on your bobbin, affecting how fast the wheel pulls the fiber through your fingers.
Loosen the tension knob if it pulls too fast, and tighten the tension knob if it doesn’t pull in enough.
Spinning clockwise or counterclockwise
Begin treadling the wheel.
I like to spin my singles clockwise and then ply counterclockwise.
A single is a strand of yarn that you spin straight from fiber; it is one strand thick.
A ply is two or more singles twisted together.
For the plied yarn to twist together properly, you need to switch your spinning direction.
As you’re starting, the direction is a personal preference; in more advanced techniques, the direction you spin the wheel matters more depending on the yarn structure you are aiming for.
For now, choose one direction and maintain that direction as you fill the bobbin. If you change the direction, you will be untwisting what you’ve previously twisted.
How to spin fiber into yarn
Using the fiber you drafted earlier, overlap the end of your leader yarn with the fiber.
As the wheel spins, the leader yarn will begin to twist.
Catch the end of your fiber length to the end of the yarn so that the two twist together. Once this happens, you slowly feed the pre-drafted fiber onto the bobbin.
A good rule of thumb is for every rotation of the wheel, you feed in another four to five inches of yarn.
At first, this may be hard to track, but it’s a good thing to be aware of, as the amount of twist will determine the softness or hardness of the finished yarn.
This also impacts the strength; more twist equals stronger yarn, up to a point. If you add too much twist to the yarn, it will corkscrew and curl up on itself.
Sometimes, this means you’ve added too much twist and other times, it means the tension on the bobbin is too high.
Once you’ve spun all the pre-drafted fiber, pause to inspect your work.
Pull a bit of the yarn from the bobbin to see the texture, strength, and amount of twist.
At this point appreciate your work for what it is. No need to judge your first yarn; enjoy that you’ve created something.
How to draft fiber as you spin
Now you have practiced with pre-drafted fiber and have an overall feel for how the wheel functions, the tension, and some of the movements, you can practice drafting as you spin.
Set up your wheel with yarn around a hook on the flyer and through the orifice hole.
Take a new piece of roving and lay the end of your leader yarn (the yarn you’ve previously spun) on top of the end of the fiber.
Begin spinning the wheel in the same direction you started in.
Allow the leader yarn to pick up the fibers, grasp the end with your drawing hand, and gently draft some of the fibers while you are treadling.
I like to hold the remainder of the roving pinched in my “control” hand, (my non-drafting hand) so that the twist doesn’t end up further up into the roving, causing drafting issues.
Once I have a draft of fiber, I pinch the roving again and release it with my drafting hand so that the twist can enter the new draft of fiber.
When I’m ready to draft again, I un-pinch the roving while pinching what I’ve just spun, “holding back” the twist so that I can get a smooth, even draft.
You will do this repeatedly until you have filled the bobbin with spun yarn.
Note to beginner spinners
The first yarn you spin may end up lumpy, bumpy, and grumpy.
Fear not!
I like to call this yarn art yarn.
If you go into the craft store, you’ll probably find loads of yarns that look similar.
Spinning even, perfectly balanced yarn is a spinner’s goal until they’ve reached it and then realize going back to creating variegated yarns is a challenge, if not downright impossible, without special adjustments to their wheel or spinning style.
Beginner yarn is precious because it will show how far you have come as you grow your spinning practice.
It’s unique to you. No one spins their first yarn the same as anyone else, so it’s a genuine original.
I still have the first yarn I spun.
It is lumpy, has too much twist in spots, and not enough in others.
But I love it because it reminds me of the people who taught me to spin, the enjoyment and struggle of learning a new skill, and it’s a clear picture of my progress.
I’m still not a spinning expert, but I’m further in my spinning journey than I was when I first learned, and if you are starting, you have an exciting fiber journey ahead of you as well.
Types of spinning wheels
There are two basic types of spinning wheel structures. The Saxony and the castle.
In addition to the two basic types, you’ll find electric spinners and drop spindles.
A drop spindle is the simplest version of a fiber-twisting device.
Saxony wheels
A Saxony wheel is a spinning wheel with three legs and a large wheel offset from the center of the wheel.
The larger wheel rotates between two legs with the treadle or treadles below it, while the third leg balances the wheel and holds the mother-of-all, the piece that houses the flyer and bobbin.
Source: The Woolery Ashford Traditional Wheel
The Ashford Traditional is available unfinished or with a clear finish. My wheel is older and much darker. If you are up for a DIY project, you can customize the color of your wheel to match your aesthetic.

Castle spinning wheels
A castle wheel is built with the wheel centralized.
One or two treadles sit below the wheel and connect to the wheel to turn it. The mother-of-all sits above the wheel, housing the flyer and bobbin.
Source: The Woolery Ashford 3 Kiwi Spinning Wheel
The Ashford Kiwi 3 is available unfinished or with a clear finish.
Electric spinners
An electric spinner is not a spinning wheel because no actual wheel exists.
However, it has the mother-of-all, the part of a wheel that holds the flyer and bobbin.
The rotation of the flyer is caused by electricity.
A person spins as they would on a spinning wheel without treadling their feet.
Drop spindles
A drop spindle is not technically a spinning wheel.
A shaft with a round whorl on top or bottom is held mid-air. The spindle is spun by twisting it between the spinner’s fingers like a toy top.
The spinning spindle then adds a twist to the yarn and fiber as the spinner feeds fiber down to the spindle.
Learn how to make drop spindle: 5 Drop Spindles You Can Make At Home.

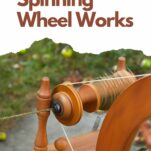
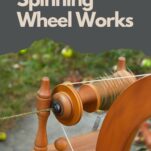
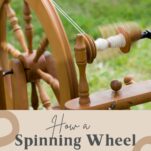
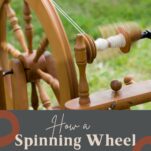
Parts of a spinning wheel
Knowing the anatomy of a spinning wheel and the vocabulary used is helpful when learning to spin and working with spinning wheels.
These terms will help you reference the different parts of the wheel and understand how a spinning wheel works.
The anatomy shown below is that of a Saxony spinning wheel. An Ashford Traveler.
The parts are similar on a Castle-style wheel.
Drive wheel
The drive wheel is the large wheel on a spinning wheel.
This wheel aims to spin around, adding rotation to a drive band that rotates the flyer.
Drive band
A drive band fits around the drive wheel and the whorl so that the drive wheel adds spin to the flyer. The drive band is a loop of cotton twine or something a little stretchy, like an acrylic cord.

Drive band adjustment knob
This is a knob on the wheel that will add tension or loosens the drive band.

Maiden bars
These are upright pieces that support the flyer.

Mother-of-all
The mother-of-all is a bar that holds the maidens.

Flyer
A flyer is a horse shoe shaped piece with hooks on one or both “arms” used to guide the incoming yarn onto the bobbin.
The flyer is powered by the drive band and spins faster than the drive wheel, adding a twist to the fiber.
The flyer has a spindle shaft, a hollow metal tube with a hole at the end and one on top where the freshly spun yarn feeds through, is guided by the hooks on the flyer arms, and then wraps onto the bobbin.

Flyer shaft
The flyer shaft is a metal rod running down the center of the flyer and holding the bobbin.
Flyer arms
The flyer arms are the two sides of the flyer that hold hooks.
Orifice hole or delta hook
An orifice hole is the spot where the newly spun fiber is pulled through and onto the bobbin.
It is an opening at the end of the spindle shaft.
Sometimes, it is a hook, a loop, or a tube through which the yarn is guided.
The orifice also determines the maximum thickness that a yarn can be, as the size of the hole is the limiting factor in the diameter of the finished yarn.

Bobbin
The bobbin is a shaft with a disc on either end.
Finished yarn wraps around the bobbin, storing it as you spin.

Whorl or pulley
The whorl and the drive wheel hold the drive band; these two work together to spin the flyer. The flyer adds a twist to the incoming fiber.
A whorl or pulley looks different on different types of wheels.
Sometimes, the whorl is part of the flyer, and other times, it is a separate piece.
Some wheels have the whorl in front, close to the orifice; others have it in the back at the end of the bobbin.
The way to identify the whorl is that the drive band goes around the drive wheel and the whorl.

Scotch tension brake band
There are several different types of tension; one is Scotch tension – a band is wrapped over the end of the bobbin or whorl to slow the spin of the bobbin.
Tightening the tension means the yarn will get pulled onto the wheel through the orifice quickly. This means less twist will end up in the finished yarn.
Loosening the tension on the brake band will slow the pull of the wheel so that more twist ends up in the yarn before it’s pulled onto the wheel.
Removing the brake band entirely means the yarn won’t get pulled into the wheel and wrap onto the bobbin.

Treadle – single or double
A treadle is a foot pedal on a spinning wheel.
Some wheels are constructed with one pedal pressed up and down to power a bar that spins the drive wheel.
Others have two pedals connecting to a separate bar, powering the drive wheel.
A single treadle wheel may have a slightly less even rotation as it begins to slow as the pedal lifts and speeds up as the pedal is pressed down.
Double treadle wheels run smoother because the two treadles compensate for each other.

Footman
A footman is a bar that connects the treadle to the axle (center point) of the drive wheel.
Single treadle wheels have a single footman, while a double treadle wheel has two connecting to each treadle.

Crank
The crank connects the top of the footman through the drive wheel axle, transferring power from the treadles to the drive wheel.